Improve Shopify Page Load Speed
In the fast paced, ever evolving world we live in today, it is a necessity to have a fast web site. The world has gone global and so have its websites, making it more important than ever to have a site that loads quickly and effectively across the globe.
And that’s where it starts to get interesting…
Optimizing images and CSS delivery of above the fold content are both things that will positively affect your page load speed, but neither can compare to eliminating render blocking Javascript in the above the fold content when it comes to improving page speed and rankings. We have identified one of the most effective and easy ways to do this on the Shopify platform and we’re going to walk you through the process step by step.
Why improve load speed?
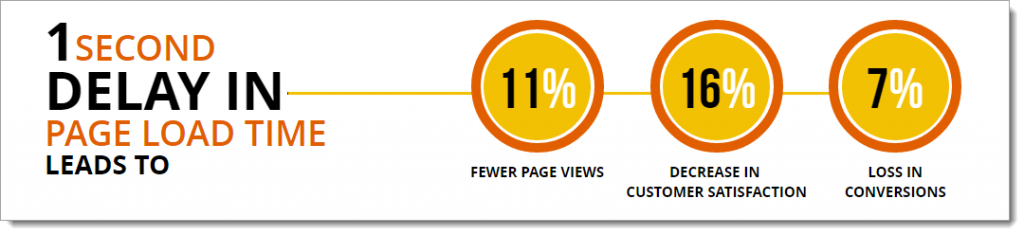
If you need any more reason to improve your load speed, these eye opening stats might do the job. For a 1 second delay in load time:
- 11% Fewer Page Views
- 16% Decrease in Customer Satisfaction
- 7% Loss in Conversions
What can I do to improve Shopify page speed?
Today, we are going to cover how to consolidate all of the JS and CSS files on your Shopify site into one JS and one CSS file to limit the amount of requests and improve overall load time. When your site has several different scripts and resources being loaded, it naturally slows load time as the server has to go and retrieve all of that extra data. By consolidating the resources into as few scripts and stylesheets as possible, it limits the amount of ‘trips’ the server has to take to get that information while still giving your site the same code. Google has a big problem with render blocking javascript in above the fold content and this is one of the easiest ways to improve that.
For more information, visit: Remove Render Blocking Javascript: Google Developers
Anyway, are you ready to make your website faster? Well, here we go…

Before we begin: Back up current data
In the Shopify back end, below Sales Channels click ‘Online Store’. The Themes page will come up and you should see your live theme displaying with a … button, an eye icon, and a blue ‘customize theme’ button. Click the … button and select “Edit HTML/CSS”. Copy all of the code in the theme.liquid file and save it in another location like Notepad or an IDE like Sublime Text (My Personal Favorite). Here you will store a copy of the theme.liquid code as it currently is, before edits. This will serve as a backup in case anything is broken along the way.
Consolidating Javascript files to improve load speed
Step 1: Create application.js.liquid file
When you have backed up your current code and have the theme HTML/CSS editor open, scroll down to the ‘Assets’ folder and open it. Click the ‘Add a new asset’ button and select ‘Create a blank file’. Call your new file ‘application’ and save it as ‘.js.liquid’ file in the drop down menu. Once you have it created, click ‘Add asset’ and get ready for step 2.
Step 2: Paste ‘theme.js.liquid’ code into new asset file
Go to the ‘theme.js.liquid’ file in the assets section and copy all of the code but do not delete it. Once you have it copied, go to your new asset file (application.js.liquid) and paste the code into the new file.
Step 3: Find other scripts on your page
Go back to the page your home page and right click to view source. When the view source tab opens up, type Ctrl F and search for the word ‘script’ in your source code. Find all of the different scripts on your page and pay attention to the order in which they are being loaded. To find the exact scripts that are giving you problems, go to Google Page Speed Insights and analyze your website. It will likely tell you to “Eliminate Render Blocking Javascript” and list out the scripts for you in order.
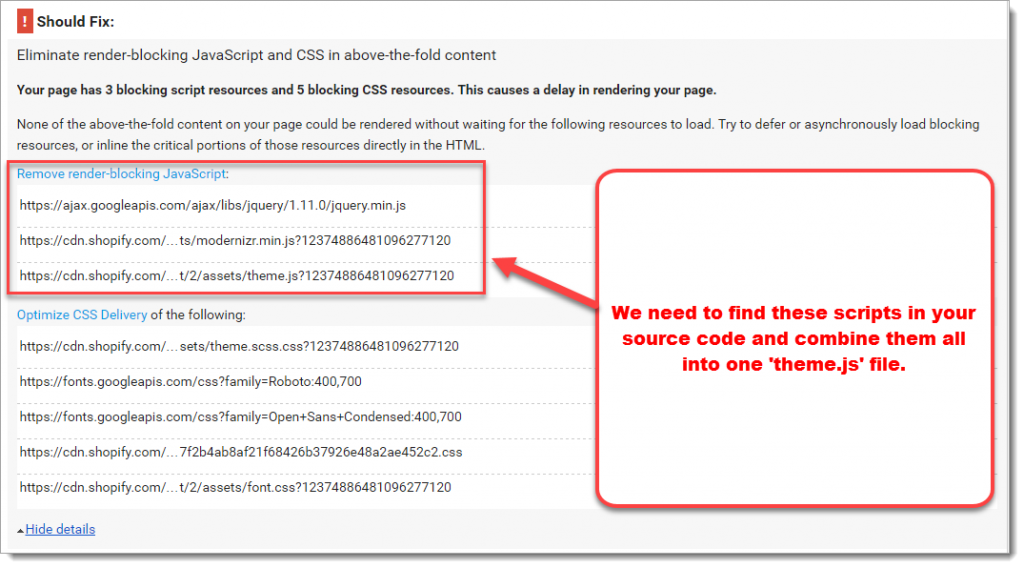
Source: Google Page Speed Insights
In the source, scroll down until you find the scripts listed in Google Page Speed Insights. They should look something like this:

Click on the link of the bottom script and check out the source code in the new tab. Copy all of that code and paste it into your ‘application.js.liquid’ file above the code that is already in there.
After that, find the script that is just above the last script you copied and click on it. Go to the source code in the new tab and copy it. Once it is copied, go back to the ‘application.js.liquid’ file and paste the new code above what is currently in there, but make sure not to delete any of the existing application.js.liquid code.
Step 4: Add the ‘application.js.liquid’ script to site
Now that you have all of the Javascript files condensed into one page, we need to add a link to that resource just above the closing tag of your site. We are going to add what is called an “asynchronously loading script”, meaning it will begin to load the second the user visits the site, instead of waiting in line to load like all of the other resources.
For more information on the concept, please visit these links for an in depth explanation:
At the bottom of your theme.liquid file, just above your closing tag, add a line like the one seen below:

Step 5: Delete jQuery and Modernizr tags from theme.liquid
After the code from the Jquery and Modernizr tags has been added to the application.js.liquid file, you can delete the individual script tags from the theme.liquid. They should look like this:

*This should not affect the display of your site, as the code is still being executed it just all exists in one file now.
If this affects the display of your site, paste the original theme.liquid code you stored as backup back into theme.liquid and start over from step 1, proceeding carefully.
Consolidating CSS files to improve load speed
Step 1: Consolidate all CSS code into theme.scss.liquid file
Go back to the home page source code, and scroll down until you find other CSS files being called (other than theme.scss). Take note of all the CSS files you find and the order in which they appear, as we need to consolidate all of those into one asynchronous file. The extra CSS files need to be added to the theme.scss in the same order in which they are displaying currently as to not affect the display of the site.
Here are some examples of what those CSS files will look like in the source:
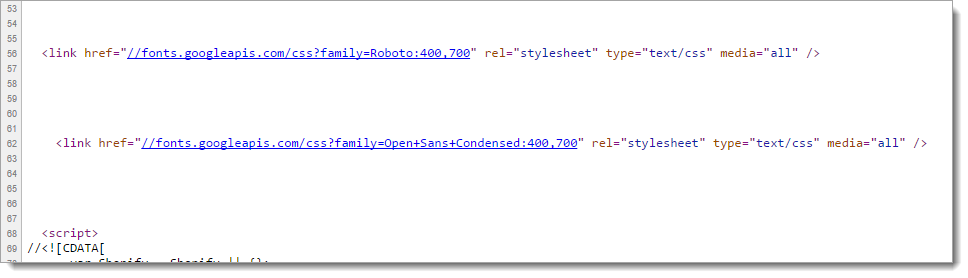
Keep in mind, in this example we would need to have the Open Sans Condensed code BELOW the Roboto code in the theme.scss.liquid.
Step 2: Find additional CSS files and add the code to the theme.scss.liquid style sheet
Go through the home page source code and find all of the CSS files that are being called and consolidate them into your theme.scss.liquid in the same order that they originally displayed on the page. You’re going to want to paste all of this code BELOW the existing CSS code so that it does not affect the display of the site.
This particular example includes:
- Google Fonts Files (CSS)
- Additional Checkout Buttons (CSS)
But, each site can potentially be different so make sure to find all of the different CSS files being used on your site and consolidate them into your main thems.scss.liquid file.
Step 3: Delete individual stylesheet tags from theme.liquid
Go to theme.liquid file in the Shopify code editor and locate the stylesheet tags in the liquid file. They should look something like this:
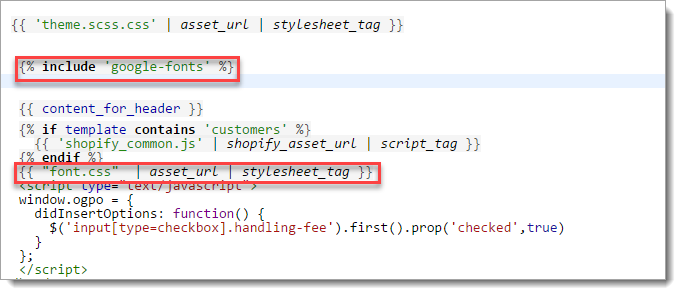
After you have confirmed that all the other CSS code has been added to the theme.scss.liquid, you can delete the individual stylesheet tags from the code.
Final Step: Make sure site is displaying correctly
Refresh the home page and make sure that everything is displaying correctly. You also need to make sure that the resources are loading in the correct order, as the wrong order will make an element display in the old format before quickly updating to the new code. The wrong order of resource loading will make the site look jumpy and needs to be ironed out before you go live.
Results:
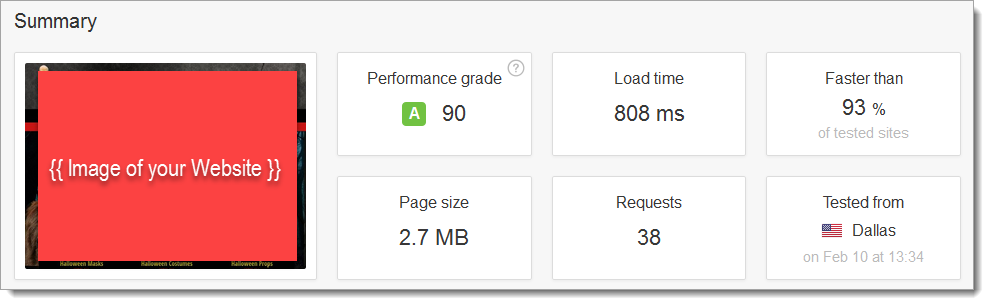
Source: Pingdom Page Load Speed Tool
Resources:
- Use Asynchronous Scripts – Google Developers: Async Scripts
- Remove Render-Blocking Javascript – Google Developers: Remove Render-Blocking Javascript
- Optimize CSS Delivery – Google Developers: Optimize CSS Delivery
- Inline CSS – Google Developers: Inline CSS
- Webby Monks – Page Load Time Stats
- Sublime Text – The Best Text Editor on the planet! (IMO)
- What is Asynchronous Loading? – What is Asynchronous Loading?
Need help with your page load speed? Give us a shout! Here